Standard event page and event data
To build an event page, you will first need to build your Data – Event.
Build the Data – Event
Use Add entry on the upper right in the content dashboard, and select Data – Event
Name – the system name that CMS users will see
Event name – the name that will be displayed to the public
Short description – a one line description of the event. This will be used in internal search results and on cards for the event around the website.
Image – add a hero image for the event. Images should have an aspect ratio 4:3 and be at least 1000px wide.
Event type – select the event type from the dropdown. This will determine whether the event is listed on the ‘Run’, ‘Walk’, ‘Cycle’ or ‘Challenge’ landing page.
Event status – select whether the event is currently ‘Register interest’, ‘Open’, ‘Sold out’, ‘Closed’ or ‘Waiting list’. This will determine whether people can sign up for the event using the CTA.
Event system date – this is the date the system uses to sort events in listings pages. If the event spans multiple days, choose the last day of the event as your event status.
Event display date – the date that will be displayed on the event page
Registration fee – enter the value but you don’t need to include the pound sign
Pledge – enter a fundraising pledge value if there is one (don’t include the pound sign)
Event location – enter an address to show where the event is being held on the map
Display location – you can use this field to override the map address text displayed as the event location (e.g. just ‘Sheffield’ rather than a specific address)
Notified team email – the email address that should be notified when someone signs up or registers interest. Usually this will be an inbox like running@shelter.org.uk.
Registration link – this will be an External link to the iRaiser form or an external event sign-up page. If neither of these apply, link to the Page – Standard Event entry (you may need to come back to this if you haven’t created it yet).
Build the Standard Event – Page
Use Add entry on the upper right in the content dashboard, and select Standard Event – Page.
Title – this should be the name of your event and will also act as the internal page name.
Slug – this is the final part of the URL. It’s auto-generated when you complete the Title field, but you can change it if needed. Click Set and the CMS will validate the slug, which is the final part of the URL.
NOTE: Once your slug is set and your page published and live, do not change it. This will change the URL and break links. Only the page title can be changed.
Select parent – assign your page to its parent (the earlier parts of the URL). For example ‘Support us – Events – Charity run’. This will update the Full path field.
Event – click ‘Add content – Add existing content’ and then select the Data – Event you just built
Main CTA text – this is the text for the main CTA button on your event page e.g. ‘Sign up’, ‘Register interest’, ‘Join waiting list’ or ‘Registration closed’
Main CTA method – this allows you to define whether the sign up for your event is either a form or a URL. Use ‘URL’ for an iRaiser form or an external sign-up on a third party website. Use ‘Form’ for forms directly on the event page, including application forms, register interest forms and waiting list forms.
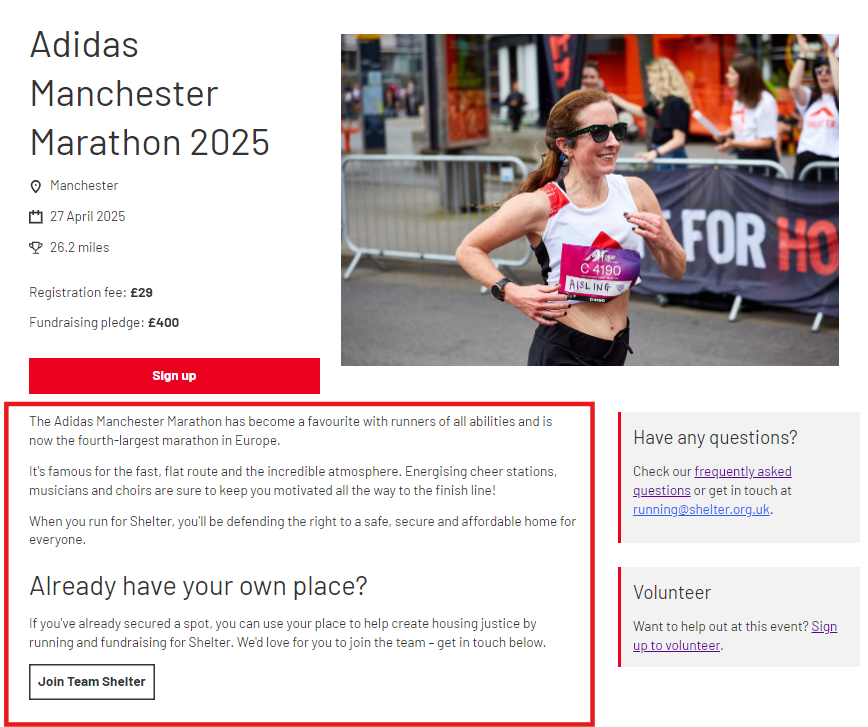
Body copy – enter the intro body text relating to your event. Please see how other events are formatted as a reference for consistency. You can embed CTAs or inline call outs into this field.

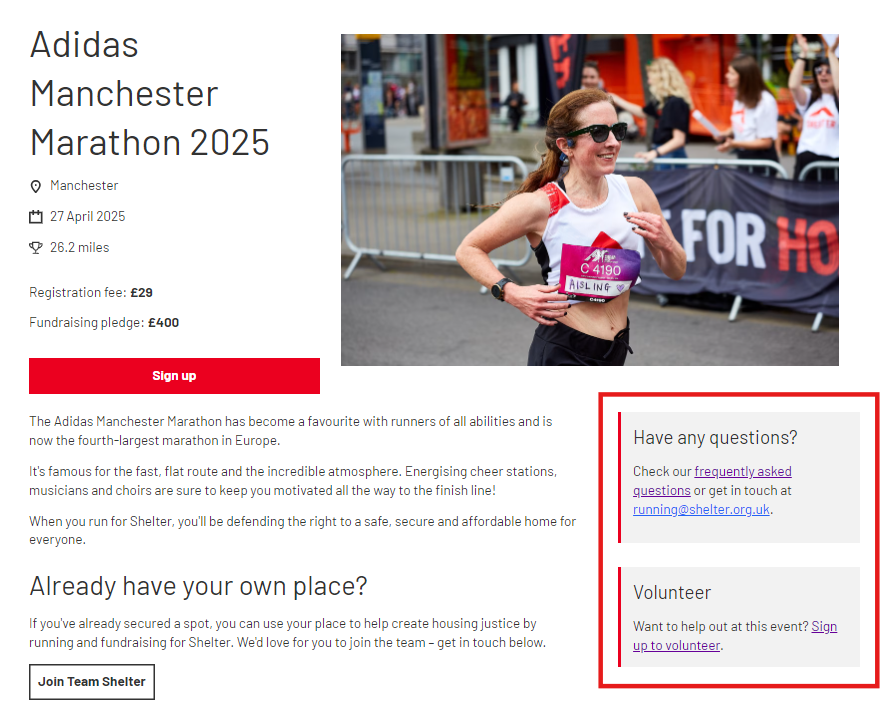
Sidebar assemblies – here you can add any sidebar content (if relevant, re-use existing components that sit on all event pages of the same type e.g. running events). Usually this will be two inline call outs:
further guidance and contact details for people to get in touch with any questions
info for people wanting to volunteer at the event

Assemblies – here you can add any two column content that sits below the main body copy. This will often include:
perks banner (created using a two column block with a grey background)
testimonials
further information about Shelter’s work
details of fundraising requirements
similar events that may be of interest
Register Interest form, Sign Up form, and Waiting List form – this is where you can add the forms you want to appear on the event. Even if you add a form to all three fields, only the form that corresponds to the Event Status (set in the Data – Event) will show on the page. This means you could add a form for each stage of the event at once and then, by changing the event status, manage sign ups throughout the event process. Find out more about building forms.
Page Information - add your metadata component here.
Preview your event and once happy, click publish.
