
Note: please use Google Chrome or Firefox as your browser.
-
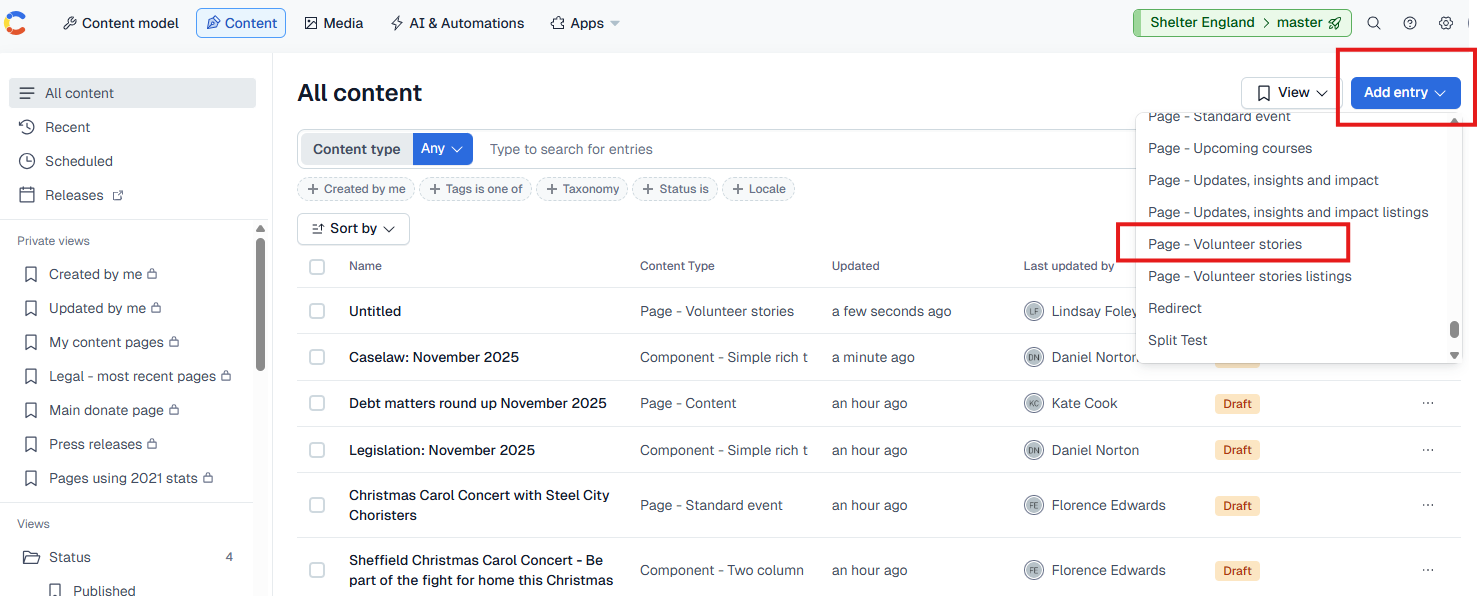
In the main dashboard view of Contentful’s homepage, use the blue dropdown upper right and select Page – Volunteer stories.
-
In the righthand column, click Start workflow. Fill in the details and click submit to set the workflow to the Editing state. Now you can start building out your page.
-
Enter the title - this will be the headline (H1) at the top of your page and should be short and concise. For example: “Emma’s story” or “How volunteering gave Wendy a 'new sense of identity.”
-
Set your slug - the slug is the last part of a web page’s URL including the final slash, eg: /emmas_story.
-
Click Set and wait a few seconds. You should see a green tick with the message ‘Slug validated!’
NOTE: Once your slug is set and your page published, do not change it. A page’s URL is the address the entire web knows it by. You can change your title but not the slug. It is fine to change your slug before publishing, but you will need to click Set again to register the change.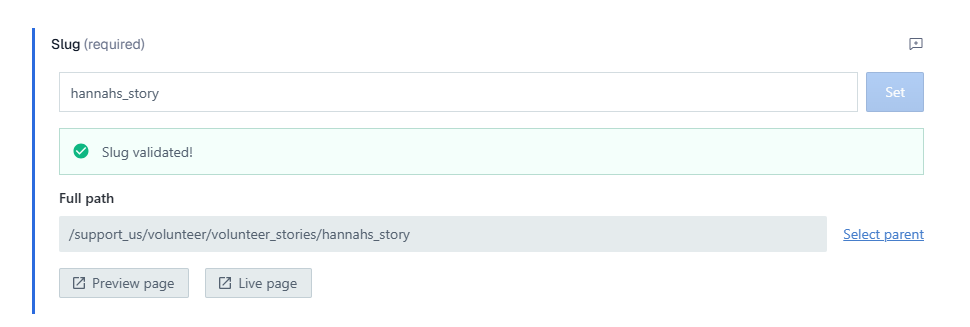
-
Ignore Full path and Select your parent. These determine the full URL of your press release page, but Contentful will automatically create it for volunteer stories.
-
In the Subtitle field, you can add a line of copy that will be styled as a heading and sits above where the main copy of the page will begin. This is an optional field.
-
Now you need to add a Header image - ideally every story should feature a hi-res photo of the volunteer. If you don’t have an image, you can leave this field blank and the field will be populated by the generic Shelter arrow instead.
-
To add a new image, click Add media > Add new media. A new window will open and you can drag and drop your image onto the File field. Your image should be a .jpg and should be less than 10mb in size.
-
Once the photo is uploaded, you can use the crop tool to crop your image to a square - the image on the page will be square to it’s best to do this to make sure the photo is centred correctly.
-
Add a title to your image that explains what the photo is of (e.g. ‘Retail volunteer Wendy'). You also need to add a short description into the Description field. You must add this as it will be used as alt text for people using accessibility tools or if the image fails to load. E.g. 'Retail volunteer Wendy wears a coat and smiles as she organises clothes in a Shelter shop’.
-
Once all fields are populated, click the back arrow at the top of the window to move back into your page entry, where you should now see a preview of your image in the Header image field.
-
Add a Publish date. You can also add a Last updated date if updating a previous entry, but this is an optional field and won’t be relevant to new content.
-
Now add the Author. Click the arrow dropdown next to Add content and choose Add existing content if the author has posted before or Data - Person is you need to add a new author to the system.
-
When adding a new author, a new window will open and you will need to populate the template fields. You must add a First name, Last name, Photo and Category (which should be ‘neutral’). The other fields are optional but it may be useful to include the job title category for Shelter staff. Once complete, click the back arrow to move back into the page entry.
-
The volunteer’s story goes into the Main body text field. Remember to clean your text before pasting it into the body copy field using CTRL+SHIFT+V. You’ll then need to reformat the spacing between paragraphs.
-
At the end of your content, embed a CTA to encourage users to take an action like browsing volunteering opportunities. These have been preset by the team, so click embed in the top right of the text editor > choose embed entry. You can then search for the right CTA using the search bar.
-
Once finished with the text, you’ll need to create a new metadata entry for your page. Once the new entry has opened, add a Name and SEO title - this should be the name of your page and the same text should go in both fields.
-
You also need to add an SEO description and a Description. Again, the same copy can be used for both fields and should be one or two sentences giving a summary of what the page is about. For example, 'Read Emma’s story about what it’s like to volunteer in the Finchley Road Shelter charity shop.'
-
Click the back arrow to go back into the page entry.
-
You should now be ready to submit your page into the workflow to be reviewed by an editor. In the righthand column, find the workflow section and move your page to ‘In review’.